
REAPER: Adjustments after installing
After installing, we’re going to change a few things to avoid problems and improve your experience.
Let’s start by opening REAPER.
You will probably get a popup for ReaPack. Simply dismsiss it by clicking OK.
-
When opening REAPER after installing everything, you should get a popup asking you to pick an audio device or alerting you that it cannot open an audio device.
SelectYesif you’re asked or.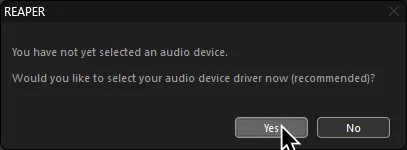
If you’re told there’s an error, select
Audio deviceinstead.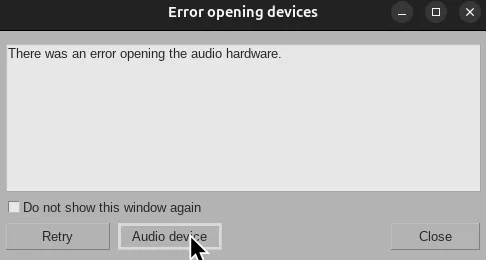
If not, click on
Options>Preferencesand scroll down toAudio>Device.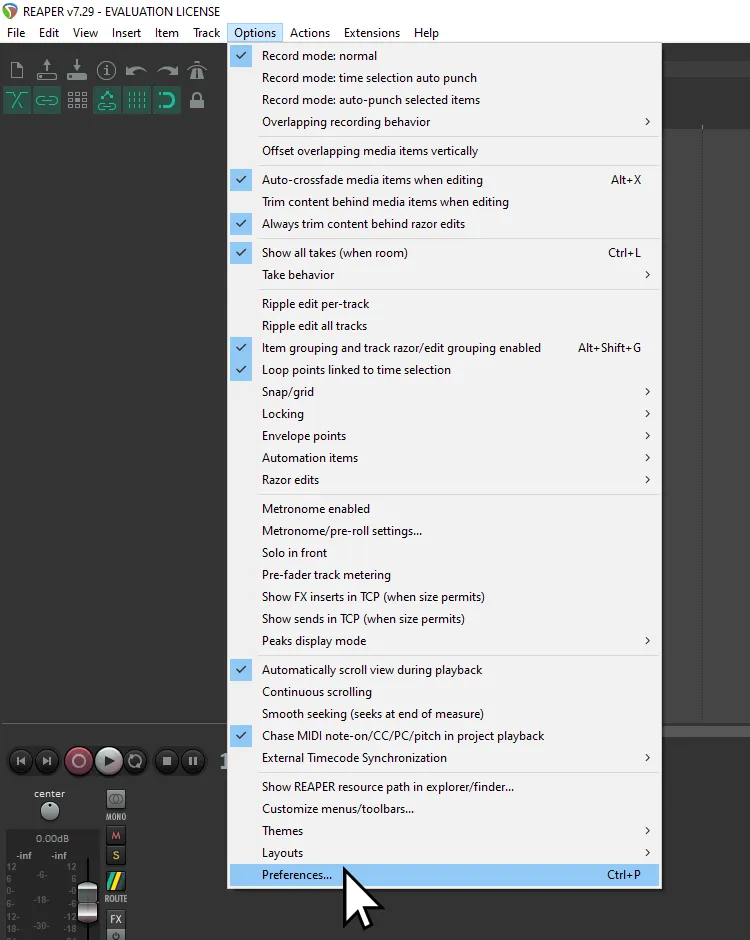
- Change
Audio SystemtoWASAPI.
You can try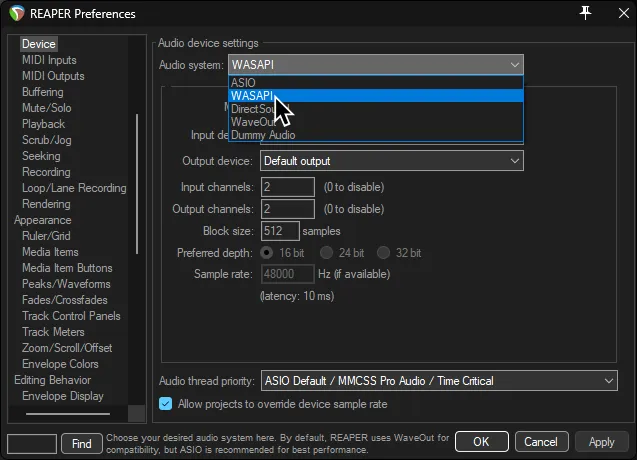
DirectSoundorWaveOutbut they add a lot of latency!
If you have a decent audio interface, you can useASIOinstead for minimal latency.
- Change
Audio Systemto whichever option works better for you.JACKis recommended as it’s the easiest.
You can try also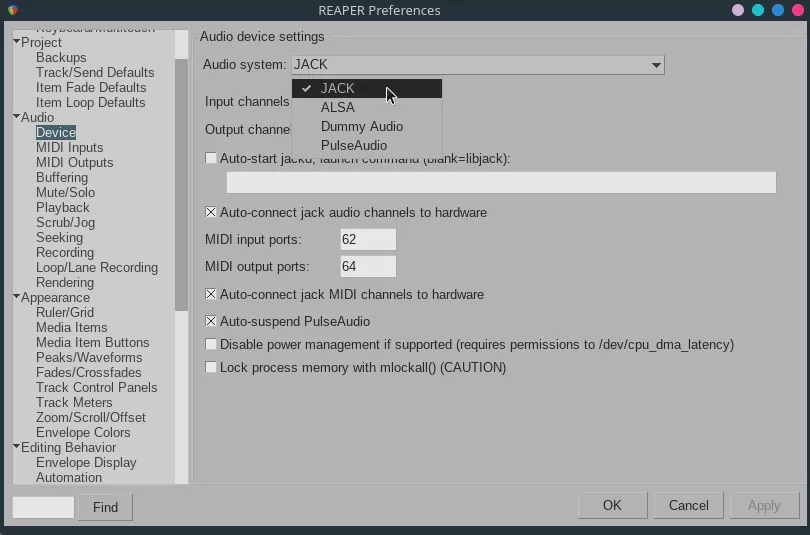
Pulse AudioorALSAifJACKis incompatible or you simply want to use something different.
Backups
Section titled “Backups”-
Scroll down to
Project -
Click on
Backups- a. Enable
Auto-save to timestamped file in project directory.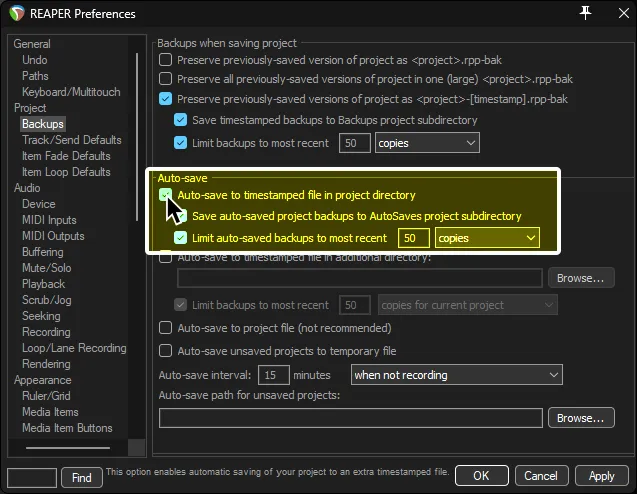
This will let REAPER create backups of projects. Helpful in the rare case that it crashes.
- a. Enable
Item Fade Defaults
Section titled “Item Fade Defaults”-
Scroll down to
Project -
Click on
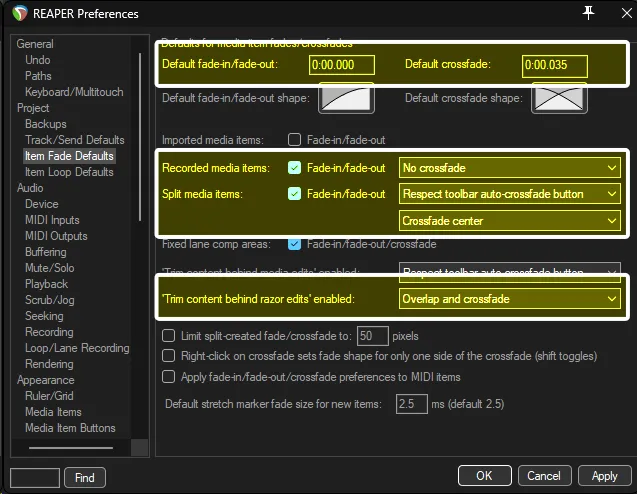
Item Fade Defaults- a. Change
Default fade-in/fadeout:to0:00.000 - b. Change
Default crossfadeto0:00.035 - c. Change the dropbox next to
Split media itemstoRespect toolbar auto-crossfade button. - d. Change the dropbox below this section to
Crossfade center - e. Change
'Trim content behind razor edits' enabledtoOverlap and crossfade
- a. Change
Item Loop Defaults
Section titled “Item Loop Defaults”-
Scroll down to
Project -
Click on
Item Loop Defaults -
Disable every option under
Loop source for: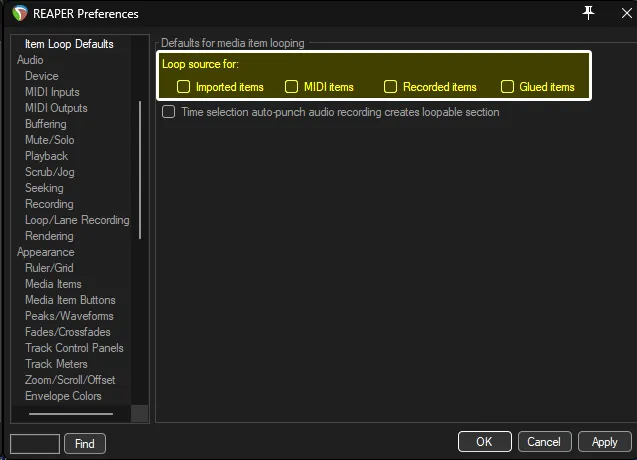
Track folder behavior
Section titled “Track folder behavior”-
Scroll down to
Appearance -
Click on
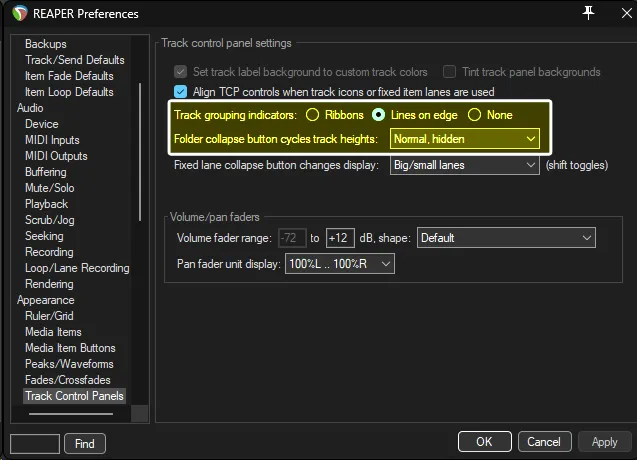
Track Control Panels- a. Change
Track grouping indicatorstoLines on edge - b. Change
Folder collapse button cycles track heightstoNormal, hiddenorNormal, small, hidden
- a. Change
MIDI Settings
Section titled “MIDI Settings”-
Scroll down to
Media. -
Click on
MIDI.- a. Change
Ticks per quarter note for new MIDI itemsto480. - b. Change
Character set for exported .MID text eventstoLatin-1.
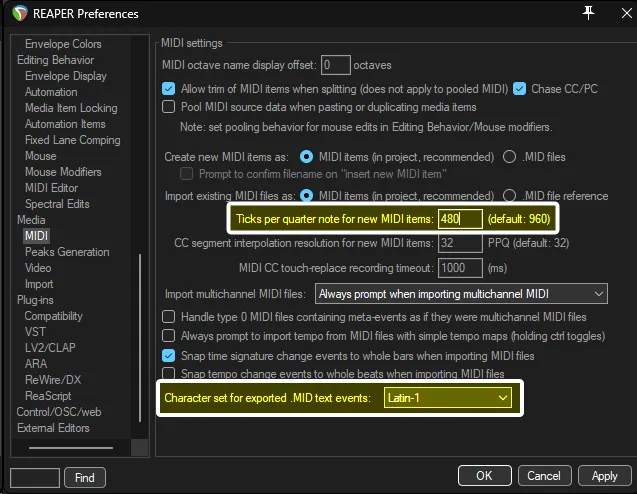
Rock Band relies on MIDI being set to
480Ticks/PPQ. Without this, Rock Band and even tools made for charting will fail in weird ways. - a. Change
Enabling Python
Section titled “Enabling Python”-
Scroll down to
Plug-ins -
Click on
ReaScript
- Enable
Python for use with ReaScript.- a. If Python isn’t found automatically, it’s usually in
C:\Users\[username]\AppData\Local\Programs\Python[Python Version] - b. The DLL will always be “
Python[version].dll”, i.e.Python314.dll
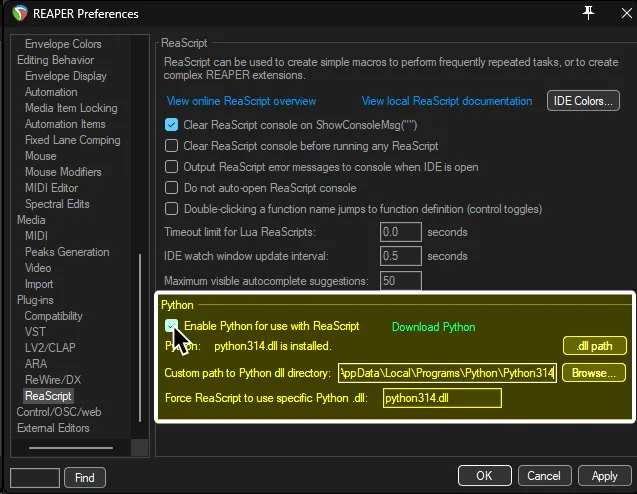
- a. If Python isn’t found automatically, it’s usually in
- Enable
Python for use with ReaScript.- a. If Python isn’t found automatically, set the custom path to
/usr/lib - b. Set
Force ReaScript to use specific Python .soto/libpython3.so.
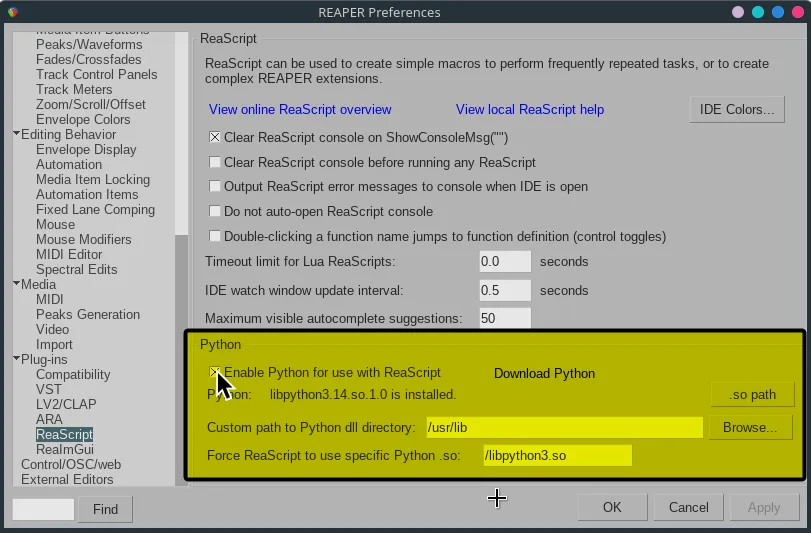
- a. If Python isn’t found automatically, set the custom path to
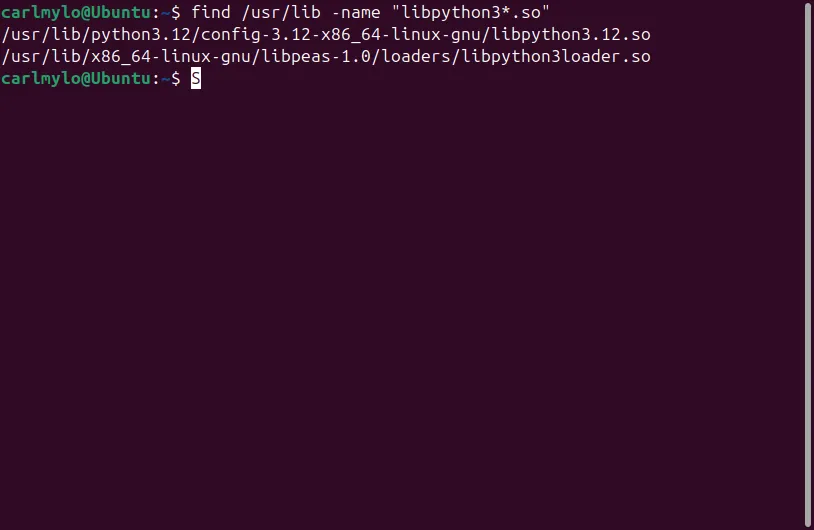
If this does not work, you will have to manually find Python3. The easiest way is to type this command into the terminal:
find /usr/lib -name "libpython3*.so"This will find any Python3 library entries on your computer.

- Enable
Python for use with ReaScript.- a. If Python isn’t found automatically, set the custom path to
/lib64/ - b. Set
Force ReaScript to use specific Python .sotolibpython3.so.
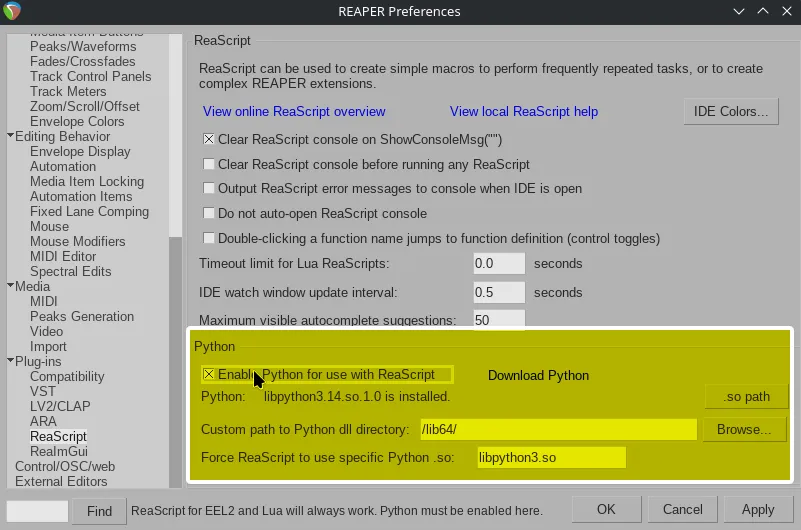
- a. If Python isn’t found automatically, set the custom path to
If this does not work, you will have to manually find Python3. The easiest way is to type this command into the terminal:
ldconfig -p | grep python3This will find any Python3 library entries on your computer.

- Enable
Python for use with ReaScript.- a. If Python isn’t found automatically, set the custom path to
/usr/lib/x86_64-linux-gnu/libpeas-1.0/loaders/ - b. Set
Force ReaScript to use specific Python .sotolibpython3loader.so.
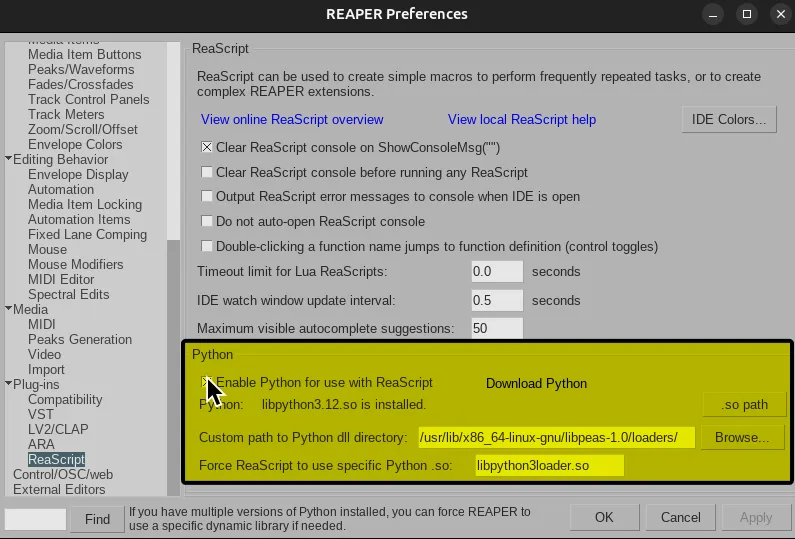
- a. If Python isn’t found automatically, set the custom path to
If this does not work, you will have to manually find Python3. The easiest way is to type this command into the terminal:
find /usr/lib -name "libpython3*.so"This will find any Python3 library entries on your computer.